
Bluevua RO systems are known for being highly effective and reliable, and quite easy to set up yourself. In this guide, we’re going to explain how you can install your new Bluevua RO system effectively at home.
To install the Bluevua RO system, you need to set up the cold water inflow system, the pure water output system, the wastewater disposal system, the storage tank, and then finally flush the entire unit before it is ready to use.
In this guie, we describe the process of installing Bluevua RO systems in easy steps so that you can follow at home. We’ve also attached some pictures from the official Bluevua manuals to help you with the process. At the end, we’ve included answers to some common questions that you may have about the Bluevua RO system.
Installing the Bluevua RO system
Bluevua RO systems mainly come in two forms – the freestanding countertop versions, and the undersink versions.
The countertop (free standing) models don’t require much installation at all. So we’re going to focus on the installation process for the two undersink models: RO100CEL and RO100DS.
Please note that these systems have been designed to be installed by the user at home. The entire process is not too difficult. However, it does require a bit of patience and a bit of time as well.
Precautions before installing a Bluevua RO system
Before we begin with the installation process, there are some things to be kept in mind:
- Do not perform the installation outdoors, or in places with direct sunlight.
- Make sure the temperature is not below freezing point (0C, or 32F)
- Make sure the space around you is safe. This means keeping the devices away from flammable items and from children or pets.
- Do not perform any disassembly or assembly outside of the steps outlined in subsequent sections.
Materials you will need
To install your RO system you will need:
- A variable speed drill
- Two quarter-inch drill bits
- Pliers and screwdrivers
- An adjustable wrench
- Scissors
- A flashlight
- A Towel
How to Install the Bluevua RO system
Step 1: Equipment Preparation
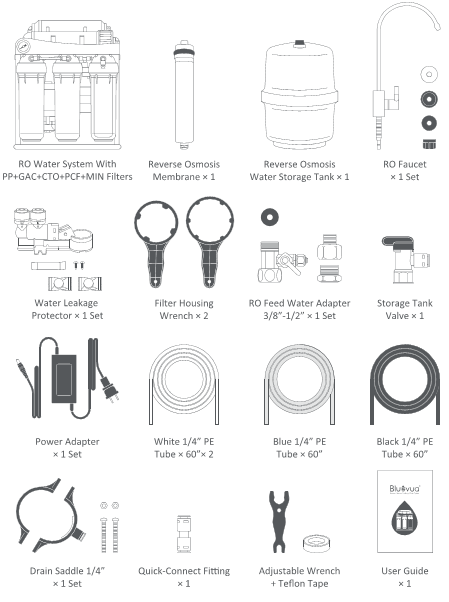
Make sure you have all the pieces you need in place. This includes:
- The RO water system with its filters
- The RO membrane filter
- RO water storage tank
- RO faucet
- Water leakage protector
- Filter housing wrench
- RO feed water adapter
- Storage tank valve
- Power adapter
- White, blue and black PE tubes
- Drain saddle
- Quick connect fitting
- Adjustable wrench and a teflon tape
We have attached a snippet from the user manual below so you can recognise which part is which.
Step 2: Install the Feed Water tubing
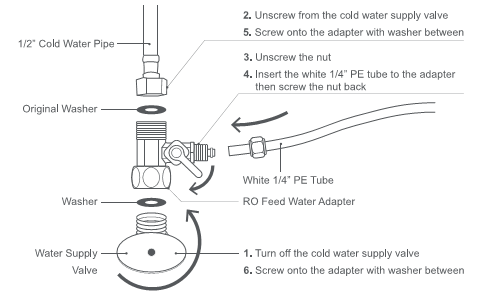
- Turn off the cold water supply valve beneath your sink
- Unscrew the cold water pipe from the supply valve.
- Get the RO feed water adapter, and unscrew the nut on its side.
- Get the white PE tube and screw it to the side of the RO feed water adapter. Tighten the nut to fix it firmly in place.
- Now, connect the upper end of the RO feed water adapter to the original cold water pipe.
- Connect the lower end of the RO feed water adapter to the cold water supply valve.
So far, you should have the RO feed water adapter between your cold water supply valve and the cold water pipe. The white PE tubing should be coming out from the side of the RO feed water adapter.
The image below may make it clearer:
- Get the water leakage protector. Note that it has two openings, labelled ‘In’ and ‘Out’.
- Measure appropriate length of white tube to enter the ‘in’ portion of the leakage protector. Cut the tube, and connect it to the ‘in’ port.
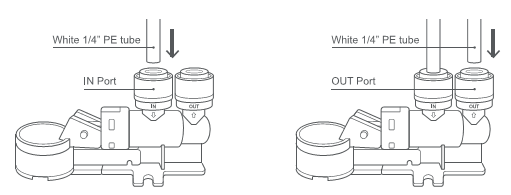
- Open the cover of the water leakage protector. Put the cotton piece inside this cover, and then close it.
- Using the double sided tape attached to the protector, stick it near the RO machine.
- Take a piece of the white tube again. Connect one end of it to the ‘Out’ port of the leakage protector, and the other end to the feed water port on the machine. Cut the tube if needed with a utility knife or scissors.
What we have done so far basically allows cold water supply to reach our machine. We have also set a leakage protector in place.
Step 3: Install the Pure Water Tubing
In this step, our goal is to connect the pure water coming from the machine to the faucet.
- Get the faucet rod. Attach the upper cap and the mounting washer on it.
- Put the faucet rod through the hole in the countertop. If there is no hole, you will have to create one using a handheld drill and drill bits.
Make sure to use appropriate material (diamond core for granite, carbide for stainless steel)
- Now, put the bottom cap on the rod underneath the sink and tighten it so that the faucet rod stands firmly on the sink.
- Get the quick connect fitting and place one end of it on the bottom rod. Pull on it to make sure it fits well.
- Take the blue PE tube and attach one of its ends to the lower end of the quick connect fitting.
- Measure the distance of the blue tube to the machine and cut it using scissors or a utility knife. Then, fix it to the ‘pure water’ outlet on the main filter machine. It should fit the outlet with simply the pressure from your hands.
Step 4: Install the Waste Water Tubing
By this point, we have the appropriate setup that allows cold water to enter the machine, and pure water to come to the faucet from the machine.
The next step is to install the waste water exit setup.
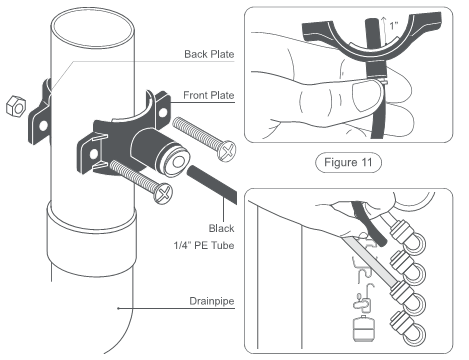
- The wastewater will go through the existing drain pipe of your sink. Choose an appropriate location in this pipe to connect the RO waste water flow. It is much easier if you install this on the vertical part of the drain pipe.
- Carefully, make a ¼ inch hole on the side of the drain pipe. Be careful not to accidentally puncture the other side of the pipe.
- Get the drain saddle. It has a front plate (with a hole) and a back plate (without one). Place the front place adjacent to the hole you just made on the pipe, and place the back plate opposite the hole.
- Get the black PE tube. Attach one of its ends to the hole on the front plate of the drain saddle. Insert the pipe till about one inch of it is inside the front plate.
- You will notice that there are nuts/screws in place to fasten the front and the back plate together. Carefully tighten them using a wrench.
- Take the other end of the black tube, and connect it to the wastewater outlet on the RO system. Cut the tube with a utility knife if it is too long.
This picture taken from the user manual of the CEL version should help:
Step 5: Installation of the RO water storage tank
- Take the RO water filter tank. Remove the blue cap on top.
- Get the storage tank valve and gently screw it onto the tank.
- To keep the valve sealed, turn the blue knob on top of the storage valve and turn it 90 degrees clockwise.
- Take the white PE tube. Connect one end of it to the storage tank valve, and the other end to the storage water outlet on the machine. Use a utility knife to cut the pipe if necessary.
At this point, all four inlets/outlets in the main RO housing (cold water, pure water, waste water and storage water) should have tubes connected to them.
Step 6: Flushing the storage tank and running the RO system
- Turn the storage tank valve off. This is to ensure that the initial filtered water does not enter the storage tank at first.
- Get the adjustable wrench and remove the RO filter housing cover from the main machine by twisting it in a clockwise direction.
- Insert the RO membrane into its housing.
- Put the housing cover back by rotating it anti clockwise.
- Now, turn on the valves for the cold water supply and the RO feed adapter.
- Plug the power adapter in.
- Let the system run for about 15 minutes. This is to ensure that the filters are all flushed and free of any loose carbon particles. Once the water appears clear, let the faucet run open for at least 5 more minutes.
- Now, turn the RO faucet off, and turn the storage tank valve on. Run the system for one more minute, which should fill up the storage tank.
- Now, let the RO faucet run for a minute, which should flush out the storage tank and the associated tubing.
- Finally, turn off the RO faucet, which will automatically fill in the storage tank.
The water from the RO faucet is now clean and ready to drink.
Differences between the CEL and DS Models
When it comes to the installation steps, the CEL and DS undersink filter models are almost identical. The only difference is in the location of the machine’s inlets and the outlets.
This is better seen in the following pictures, taken from the Bluevua manuals:

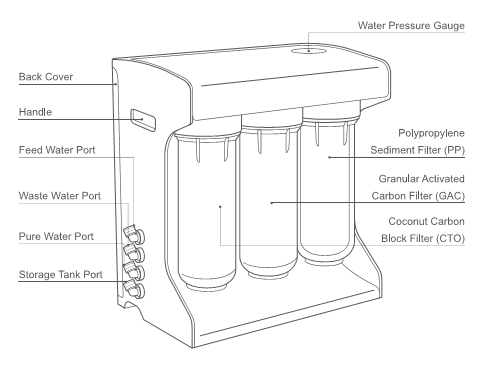
Figure: CEL version
How to replace the Bluevua RO filter
To replace your Bluevua RO filter:
- Turn off both the feed water adapter and the storage tank valve.
- Run the faucet to empty any remaining water in the tubing.
- Open the back cover by pressing on both of its buckles.
- Once the back cover is removed, you should see the RO filter.
- Remove the tubes attached to the RO filter. For this, press on the unlocking ring and simultaneously pull the tube out.
- Rotate the RO filter in a clockwise direction to remove it from its housing.
- Put the new RO filter membrane in place by rotating it counterclockwise. Make sure the O-ring is in its place to prevent any leaks.
- Re-attach the tubing to the filter. For this, press on the unlocking ring and push it towards the new filter.
- Replace the cover back on.
Why the water in your Bluevua RO is dirty
When you first operate the Bluevua RO, the system flushes out loose carbon particles from the filters. This can give the pure water a black appearance.
It’s important to let the system flush for at least 15 minutes, or for at least 5 minutes after the water turns clear. Please note that the water is not safe to drink when there are black particles in the water.
Why your Bluevua RO is louder than usual
Your Bluevua RO system may be producing excessive noise because of vibration generated by the water pump, unstable pressure of the incoming water, or because of abnormal power or voltage fluctuations.