
AquaTru Reverse Osmosis systems are known for their effectiveness and reliability, but it’s essential that your RO system is installed properly for it to work properly.
To install the AquaTru carafe or countertop system, simply wash the tanks, place the filters in their correct slots, and plug the filter in. To install AquaTru undersink, you will need to drill, and plug in a cold water inlet supply, assemble the filter components, and install a new faucet for water outflow.
In this guide, we explain how to install all three AquaTru RO models. We also highlight the possible problems in the process, and provide you with other essential tips so your experience with AquaTru filters is smooth and easy. Let’s begin.
The Three AquaTru RO Models
To install your AquaTru RO filter, you need to be certain of which model you’ve have so that you can follow the right instructions. There are three RO models from AquaTru:
- AquaTru Carafe
This is a counter-top version of the AquaTru RO filter that comes with a 64oz borosilicate glass carafe in its front facade. This particular model is designed for singles or couples.
- AquaTru Classic
AquaTru Classic is another counter-top based RO filter. Compared to AquaTru carafe, this version is considered best suited for families – which means it is bigger.
- AquaTru Undersink
As the name implies, the AquaTru Undersink RO filter sits neatly beneath your sink, connected to your sink’s plumbing. It delivers clean water directly to your sink’s faucet. This model is best suited for those who have a higher and/or more frequent need for clean water.
How to Install the AquaTru Carafe RO filter
Compared to the undersink filter, the AquaTru carafe RO filter is much easier to install and use. Follow these steps:
- Remove the tap water tank at the back of the filter. This will give you access to the filters.
- You will notice some blue plugs on the filter inlet. Remove these plugs.
- Unpack the filters, and place them in their designated slot. The filters as well as the slots are all color coded to help you in this process.
For this, simply slide the filter into the guided area, push it in until there is no more room to push it further, and then snap the filter lock in place. Check to make sure the filter is not shaky.
- Fill your tap water tank and the glass carafe both with clean, cool water.
- Place both the tank and the carafe in the filter housing.
- Plug the filter in.
- The filter should now start working. This is indicated by the blue light on top of the filter. It will keep working until your tank is empty, or until the carafe is full.
- Once the first tank is filtered, empty the tank as well as the reservoir. Do this FOUR times to flush out the filters properly. There may be some cloudiness and some black particles initially, but these should disappear by the time you empty your tank for the fourth time.
- Finally, wash both the tank and the carafe with clean water and soap.
- Put the two reservoirs back in place, and you are ready to go.
How to Install the AquaTru Countertop RO filter
Follow these simple steps to install your Countertop RO:
- Wash and dry the tap water tank, the clean water tank, as well as the working surfaces.
- Remove the filter cover. For this, simply hold and slide up the cover. It should slip out with ease.
- You will now see three filter bases, each with a sticker on top. Remove the sticker.
- The filters and the filter slots are all color coded. Simply insert the right filter in its slot. For this, place the filter, gently push it in, and then rotate it clockwise until the two red arrows coincide.
The filter bases may pivot towards you, which makes it easier to fit the filters.
- Take the clean tap water tank and fill it with water.
- Plug the device in and turn the power on.
- You will hear the pump running, which is how you know the filter is working.
- Filter out the tap water tank four times to flush out the filters.
- Rinse the tanks one more time with clean water and soap.
- Your filter is finally ready to use.
How to Install the AquaTru Undersink filter
At first glance, it might seem like there are a lot of complicated steps to installing the AquaTru Undersink filter. However, once you break down the steps into smaller, manageable chunks, it no longer feels difficult. Just keep following these steps one after another and you should be able to install the filter easily.
- First, take all the filter components out of the box and check for damage. If any piece appears to be damaged, do not proceed with the installation, and send the material back.
- Gather the following items:
- An electric drill
- An adjustable wrench
- A screwdriver
- A utility knife
- Scissors
- Teflon Tape
3. Make sure you also have all the RO parts ready in front of you. This includes:
- The filter manifold with three filters
- RO holding tank
- RO water faucet
- Cold Tap Water Adapters (1/2 inch and ⅜ inch, male and female, )
- Drain saddle
- RO faucet quick connect fitting
- RO holding tank valve
- TruPure holding tank sanitizer and gasket
- Filter manifold installation hardware
The picture below should help you identify which part is which.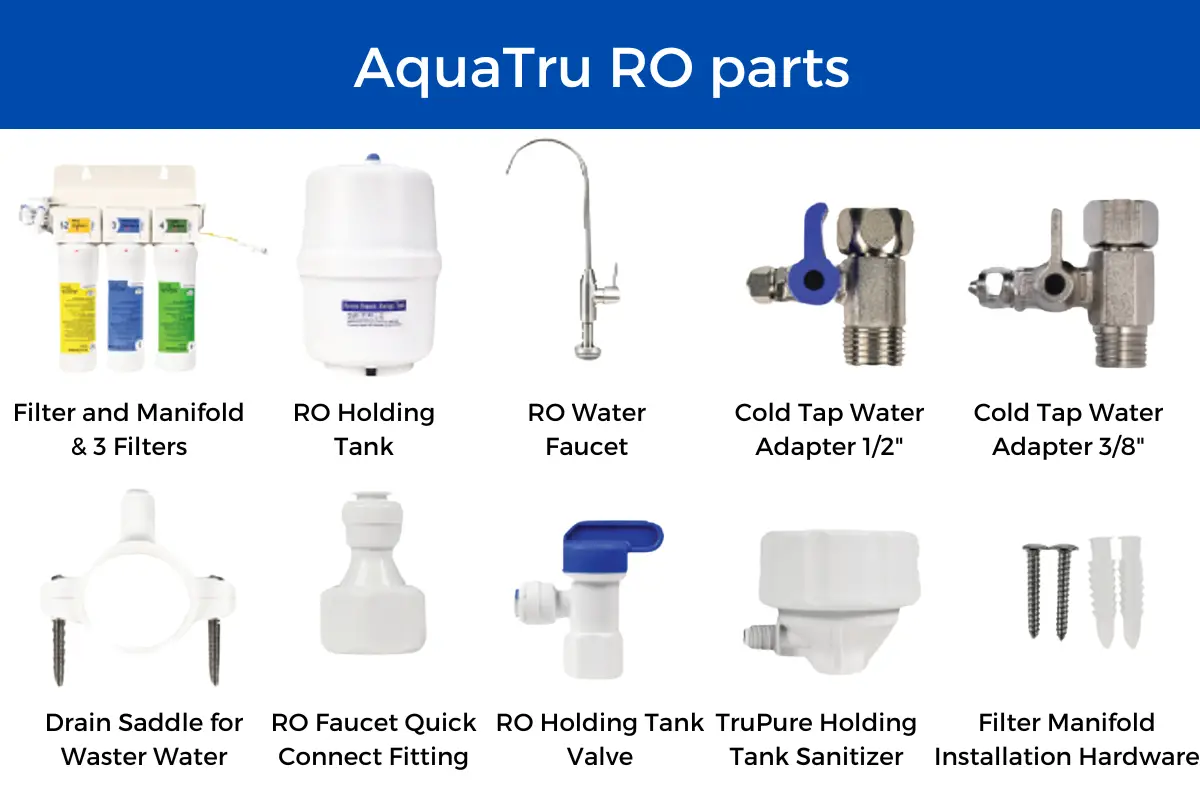
4. We can now proceed to actually installing the filter. Start by clearing the space under your sink. We recommend taking everything out from the area, which will make it much easier for you to work. If there is any remaining space at the end, you can always put your stuff back in.
5. Next, turn the cold water supply off. Then, open the cold water faucet to remove any air and water remaining in the pipe. Please note that the connection MUST be made with the cold water supply. Hot water can damage your RO system.
6. Connect the white tubing to the end of the cold tap water adapter, and fix it by rotating the screw. Based on the tubing you have, you will only need to use ONE of the two cold water adapters you have. 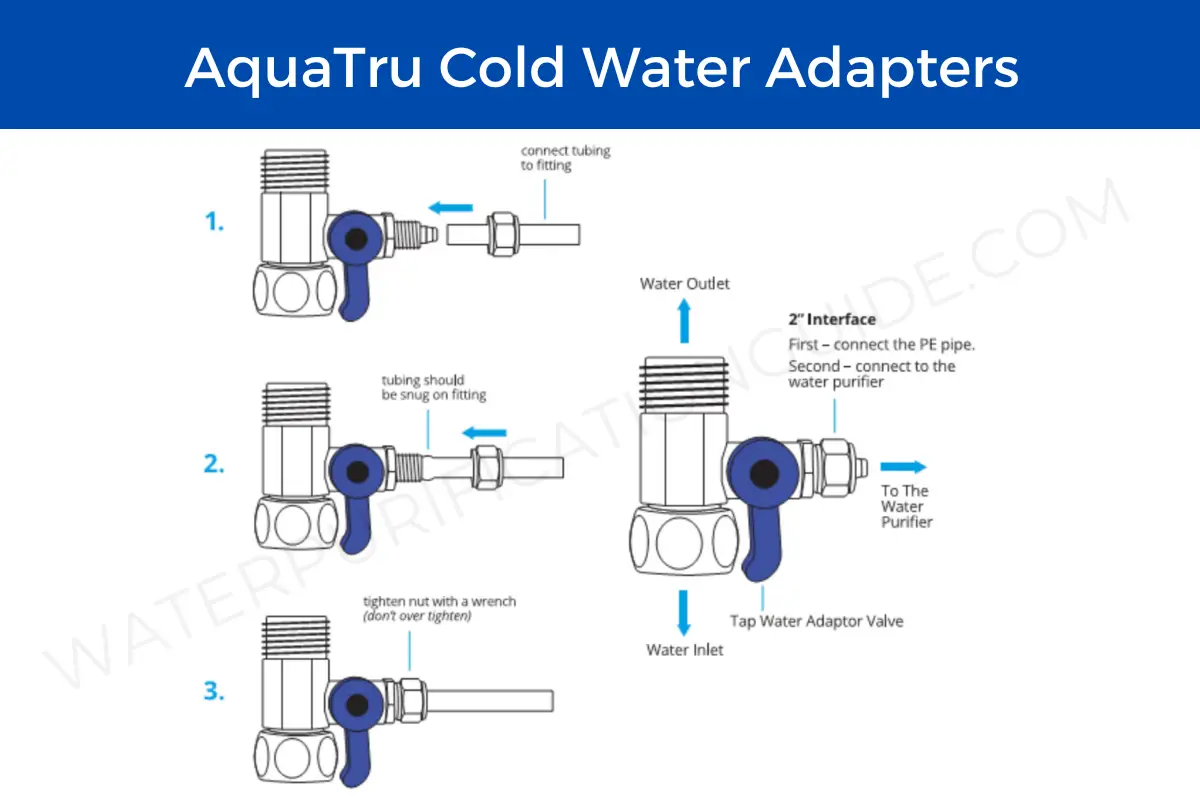
6. Now, unscrew the connection between the cold water outlet and your faucet.
7. Put a teflon tape on the exposed cold water outlet, and connect the cold water adapter. Screw the nut tight to make sure the fitting is snug and waterproof.
8. Install the faucet connector hose to the adaptor (on the outlet end, as shown in the picture above). You may use a wrench to secure everything in place.
At this point, you should have the cold water adapter connected to the cold water supply of your sink. It should have a white tube connected to it at the side, and the faucet adapter hose connected towards the faucet of your sink.
9. The next step is to insert the drain saddle to the drainage pipe of your sink. For this, follow these steps:
- Choose a position on the drain pipe, keeping it low to avoid noise when the water drains. Mark the position and use a drill to make a ¼ inch wide hole to the side of the pipe.
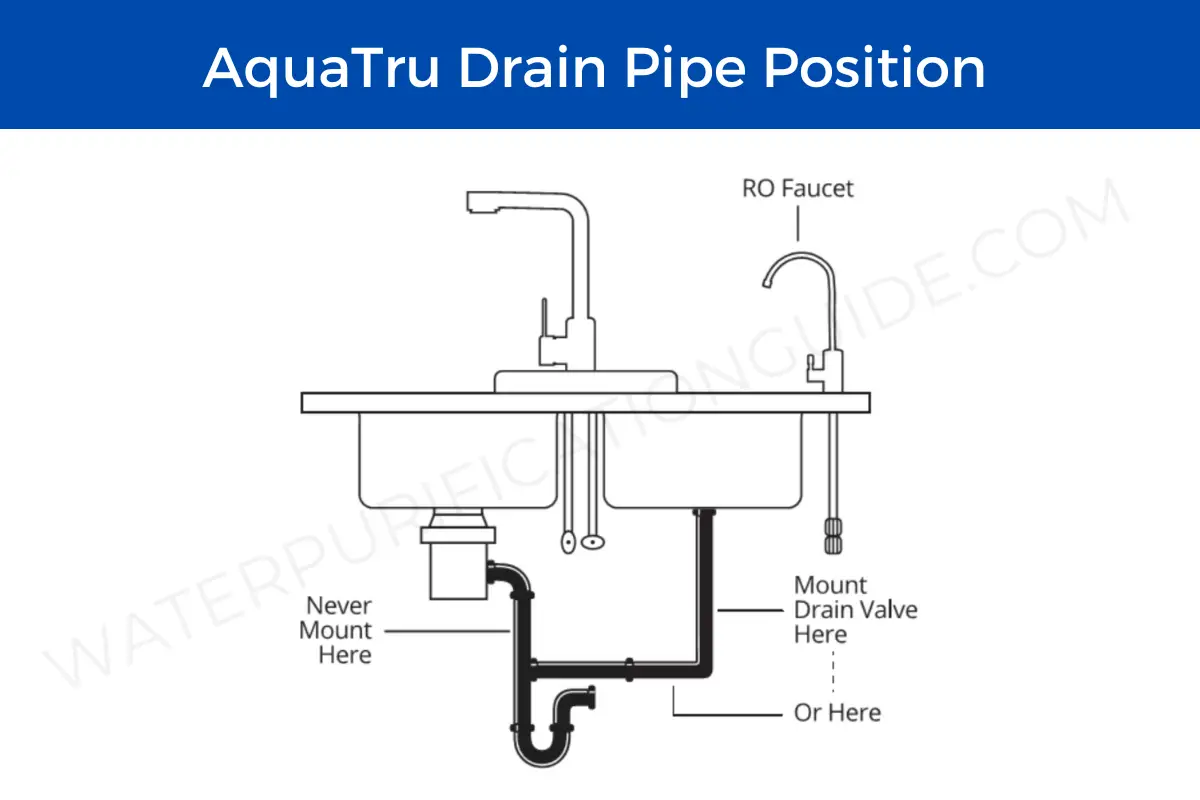
- Next, you will notice that the drain saddle comes in two halves. One of these halves has a hole. Attach the provided self-adhesive sponge to the hole so that it lines up neatly.
- Now, place the two saddles side by side with the pipe in between such that the hole on your saddle lines up with the hold you created in your drain pipe.
- Use the provided screws to fit the drain saddles in place. Do not overtighten, or you may end up damaging the drain saddle.
10. The next step is to install the actual faucet. You may use an existing hole in your sink for this, or you may create another opening in your location. Use the drill bit appropriate for your material (Eg: Marble, concrete or metal), ensuring that the hole is 13/16th of an inch wide.
- Your faucet stem has a threaded part, which has a plastic knut. Remove this knut, and place the threaded part on the hold. When placed properly, the decorative covering of the faucet (with a clear gasket) should cover the hole perfectly on top.
- On the bottom, use your hands to tighten the plastic knut. Rotate till the whole arrangement feels secure and does not move to gentle nudging.
- Now, grab the RO faucet quick connect stem and fix it to the threaded part of the faucet stem. Make sure the gasket is on the inside when doing so.
Use an adjustable wrench or simply your hands to tighten it, making sure you do not overtighten.
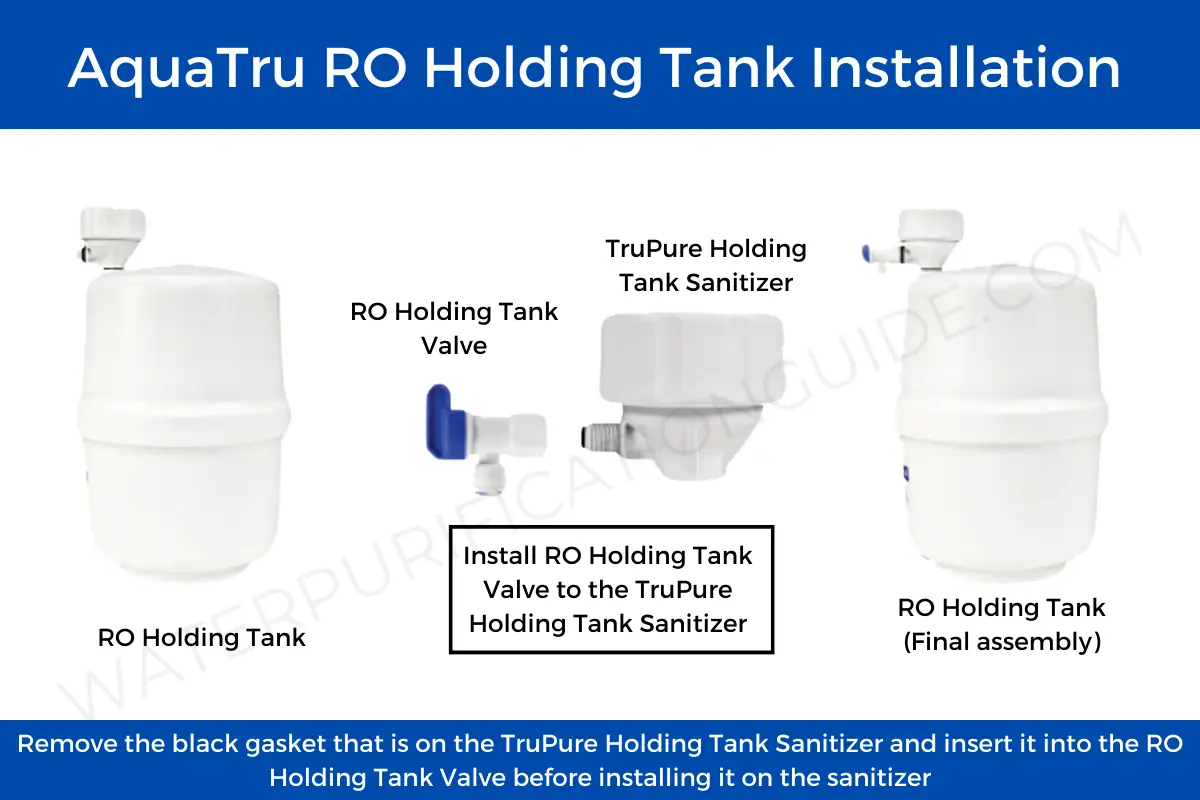
11. The next step involves installing the TruPure Holding Tank Sanitizer. For this,
- Remove the blue cap from the top of the holding tank.
- Wrap a teflon tape around the exposed steel stem.
- Take the TruPure holding tank sanitizer, and screw it on top of the stem. Tighten it with your hand.
- Unscrew the top lip of the sanitizer. You will find a small black gasket. Insert this gasket in the holding tank valve.
- Wrap a layer of teflon around the male thread of the TruPure holding tank sanitizer. Then, screw the holding tank valve to this stem with your hand.
12. It is now time to install the filters themselves. You will notice that all three filters have a unique color code. Place them in the filter manifold matching the filter to the color code.
13. The next step is to connect everything we have assembled so far. For this, take the white tubing and cut it to the necessary length using a sharp knife. Then, proceed to make connections as shown below:
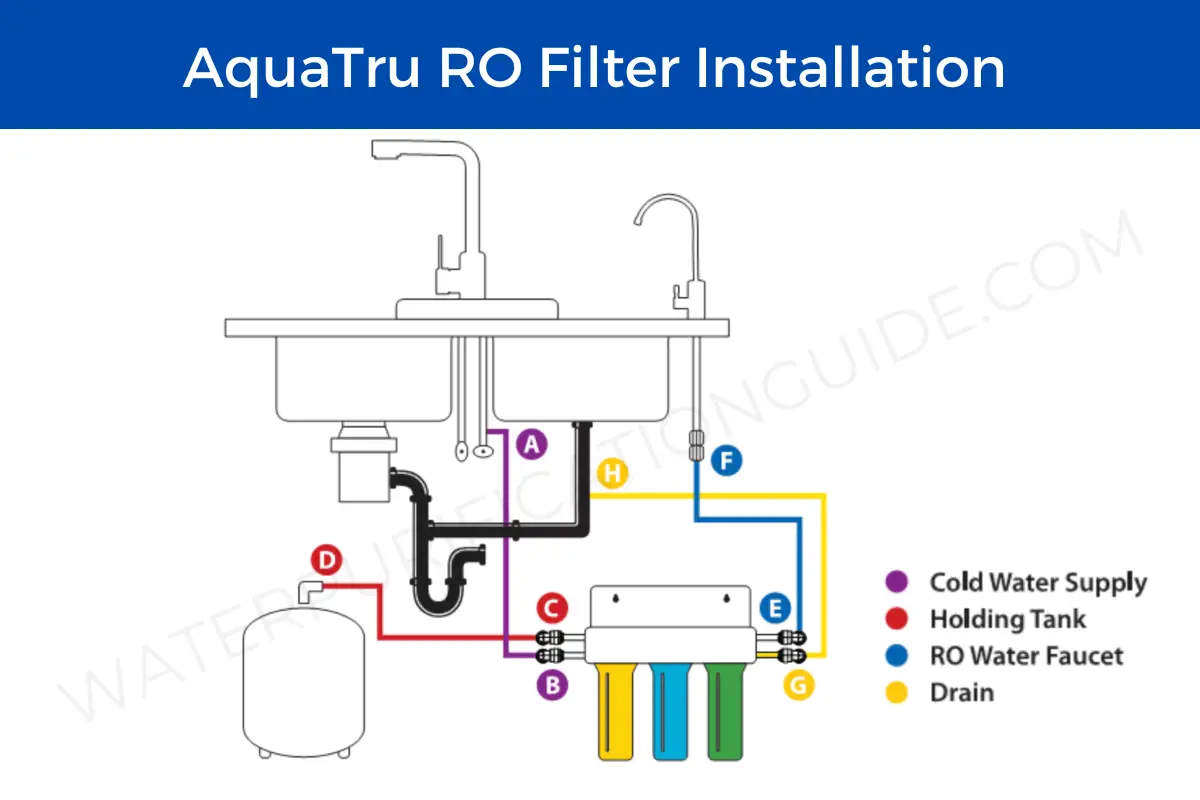
- Connect point A (tap water adapter valve) to point B on the filter manifold (marked ‘cold supply’).
- Connect point C on the filter manifold (marked ‘holding tank’) to point D (the holding tank valve).
- Connect point E (marked ‘water faucet’ on the filter manifold) to point F (of the Ro faucet quick connect).
- Connect point G (marked ‘drain’ in the filter manifold) with the yellow tubing to point H (the drain point we created earlier).
14. It is finally time to see if your installation has worked. For this,
- Slowly open your cold water supply, and turn the tap water valve on.
- Open the Ro holding tank’s ball valve and allow water to fill in. To check whether it is on, make sure the valve’s handle is in the same direction as the inlet.
- Let the tank fill completely two times, and drain it by opening the drain valve. You may notice some black particles (from the carbon filter), which is normal and nothing to worry about.
- Check for leaks during the whole process. You will also need to keep checking for leaks during the first week of usage.