
LifeStraw is famous for its filters, and their pitcher is no exception. If you’re having trouble with your LifeStraw pitcher not working properly, don’t worry they’re usually easy to fix.
A LifeStraw pitcher stops working or becomes slow when there is a blocked filter, an old or saturated filter, a damaged filter housing or the filter not sitting properly in the housing area.
This troubleshooting guide breaks down why your LifeStraw pitcher isn’t working and provides step-by-step instructions on how to fix it.
Reasons Why Your Lifestraw Pitcher Isn’t Working
There are a few reasons why a LifeStraw pitcher isn’t working as it should. Let’s cover the obvious reasons first, then we’ll jump into the less common ones.
If your filter pitcher has turned green, or you have some green residue in the filter housing area read this instead.
1. Old or Saturated Filter
The Lifestraw pitcher has two filters – the Membrane Microfilter and the Activated Carbon Filter. Your Lifestraw pitcher may not be working properly because one of these filters is old or saturated. Each filter has an estimated lifespan. If the filter is too old, it can’t filter your water as effectively as it used to, and your water quality may be compromised.
This happens because over time the filter becomes saturated with contaminants that it’s removing from your water.
How to Fix this Problem
Replace your old filter with a new one. Your Lifestraw pitcher needs regular maintenance to keep it functioning properly and supplying you with safe drinking water, and this includes changing the filter. The activated carbon filter has a limited lifespan of about 40 gallons of water, after which it needs to be replaced.
If you can accurately estimate when you’ve gotten to 40 gallons, that’s perfect. But otherwise, it’s best to replace the filter every 2 months. The Membrane Microfilter lasts longer – about one year, and can filter 264 gallons of water.
If you filter a lot of water or your water is high in sediments, your filter will become saturated earlier than the estimated time and will need replacement.
To replace your Activated Carbon Filter:
- Wash your hands so you don’t transfer germs, dirt or contaminants
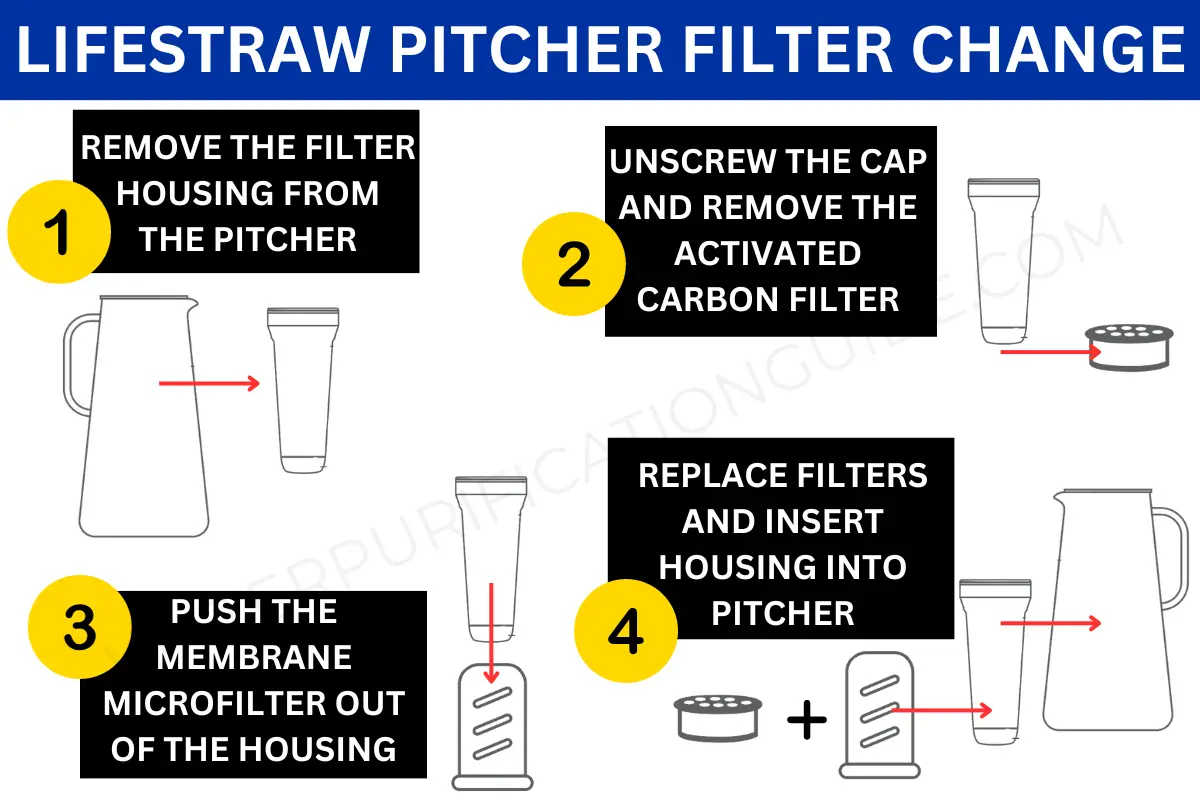
- Remove the filter housing from the pitcher
- Unscrew the cap at the bottom of the housing and remove the activated carbon filter.
- Insert the new filter in the same position as the old.
- Replace the filter cap and place the filter housing back into the pitcher.
- Fill the pitcher with a batch of water and discard this first batch once it has been filtered.
To replace the membrane microfilter:
- After removing the filter housing and the activated carbon filter, remove the easy-fill lid on the filter housing.
- Use your hand to push the membrane microfilter out of the filter housing.
- Insert the replacement membrane microfilter through the base of the filter housing. Apply firm pressure to push in the edges, ensuring a tight seal.
- Reassemble the activated carbon filter, filter cap, and easy-fill lid and place the filter housing back into the pitcher.
- Fill the pitcher with a batch of water and discard this first batch once it has been filtered.
And that’s it, your Lifestraw pitcher has a new filter and is ready for use.
2. Blocked Filter
The Lifestraw pitcher takes some time to filter your water. But if you notice that the filtration is slower than usual or there is no water flow, this could mean your filter is blocked – this is different to a saturated filter.
The Lifestraw pitcher uses a gravity-fed water filtration system. The pitcher can take seven cups of water and it needs about 15 minutes to filter all this water, so if your pitcher is filtering slower than this it’s likely blocked.
A filter can be blocked by two things:
- Debris or dirt
- Air bubbles
As water flows through, the filters hold back some large pieces of dirt or debris. This blocks the water from going through the filter, even though the filter itself has plenty of space for it. This problem is likely to happen if your water has a high sediment level.
Sometimes, air bubbles are be to blame though. This is more common in newer filters, or recently backwashed or flushed filters.
How to Fix this Problem
If your filter is new, it is normal for air bubbles to slow down the flow of water at first. But after the first three or four batches, the air bubbles will go away, and your flow rate will begin to improve.
If you’ve been using your filter for a while and it seems to be blocked, you can try rinsing out the filter. You can also gently remove any large pieces or dirt with your hands.
To do this, remove the filter housing, twist off the filter housing cap at the bottom, and remove the activated carbon filter. Hold the filter under flowing water from a faucet to try and dislodge any dirt clogging your filter. Replace the filter and test it again.
If the filter still isn’t working after rinsing it out, you might need to get a replacement filter as it could be blocked on the inside. Replacing your filter is very easy to do. Follow the steps above to remove the filter, then insert a new one.
3. Damaged Filter Housing
Sometimes, a Lifestraw pitcher stops working properly because the filter housing area is damaged. These structural faults like cracks, breaks, or leaks in the filter housing (or even the pitcher itself) reduce the efficiency of the pitcher.
A broken part is usually easy to spot. If your filter housing is broken, unfiltered water will drip down from the sides of the housing instead of from the bottom where the filters are. If the pitcher itself is broken, the crack or break it’s fairly obvious, and water may leak out and spill.
How to Fix this Problem
Depending on the damage, either the part will need replacing or your whole Lifestraw pitcher. If the leak is in the filter housing, for instance, you can buy just a replacement filter housing without needing to replace the entire pitcher.
With your replacement part ready, follow these steps:
- Wash your hands thoroughly so you don’t transfer dirt or contaminants from your hands to the pitcher
- Prepare a clean workspace. Preferably a well-lit area close to a sink.
- Disassemble the pitcher and remove the broken housing area. Check the other parts of the pitcher for cracks, leaks, and any other faults.
- Replace the broken housing area with the new one. Make sure the replacement is properly seated and aligned according to LifeStraw’s instructions (included with the replacement part).
- As you reassemble the pitcher, rinse all the parts with clean water. You can clean them with a little soap, if you want, but remember not to let soap into the filter itself.
- If the old element is disposable, follow your local regulations for proper disposal. Some elements may be recyclable in your area, but not others.
4. Unseated filter
If your Lifestraw pitcher isn’t working, it could be that the filter isn’t seated properly in the housing area. This can also cause water to leak around the filter and drip down the sides of the filter housing area, along with any contaminants in your water.
How to Fix this Problem
To fix this issue, follow these steps:
- If the filter isn’t properly seated, remove the filter cap and remove the activated carbon filter.
- Rinse the cap and filter with clean water to dislodge any dirt or debris that may be getting in the way of a proper seal.
- Place the filter into the filter cap – not directly on the filter housing. The black ring should be facing upwards, parallel to the ring on the cap itself.
- Before re-inserting the cap, press the edges of the Membrane Microfilter firmly to make sure it is seated properly.
- Fix the cap back in place at the bottom of the filter housing. Push the cap in completely, and make sure it is well seated with no part of the black ring showing.
- Check that the easy-fill lid is well seated in the filter housing
- Insert the filter housing into the pitcher. The spouts of the housing and the filter should align.
Before drinking the filtered water, rinse out the entire system by filling it up with water and discarding this batch of water once it has been filtered.
Note: Carefully read and follow the manufacturer’s instructions while you’re setting up the system. After installation, check for any leaks around the filter compartment or other parts of the pitcher before drinking the water